If you are placing any images into your ePub, three basic formatting tools you probably want are 1) Text wrap, 2) Float right, and 3) Float left. If you are creating your ePub with Adobe InDesign up to version CS5, you’ll have to implement text wrap and floating left or right by writing the CSS yourself. This blog article will show you how to do that.
Text wrap functions in Adobe InDesign ( at least up to version CS5) do not export to ePub. If you have created your document within InDesign, you’ll need to export to ePub and then open the resulting ePub file in an ePub editor such as Sigil (my favorite). When doing this, remember that you cannot open up that ePub file in InDesign again. Make sure all of your InDesign work is completed on the file before you export to ePub.
As I probably mention in almost every article in this blog: an epub document is just like a mini web site complete with pages of XHTML, a cascading style sheet that controls all styling and formatting, and a folder of images or links to images. When you open your ePub up in an ePub editor, you’ll see the pages of XHTML and the style sheet.
To apply text wrap and float left or right to an image on a page of text in an ePub document, you need to do two things:
1) Open up the style sheet and add a CSS class for float left or float right.
2) Apply that style to the image.
These two things are also just what you would do if you wanted to float an image left or right and have text wrap around it on a web page.
Let’s go through the process and see how it looks:
1) Open the ePub File in an ePub Editor. Here I am using ePub editor Sigil, my favorite. You can see that an epub file is just like a mini web site. Here we can see the single page of XHTML content named Page_1.xhtml. We can also see the cascading style sheet named template.css. The top half of the display shows the WYSIWYG (What You See Is What You Get) editing screen and the bottom half is the XHTML editing screen
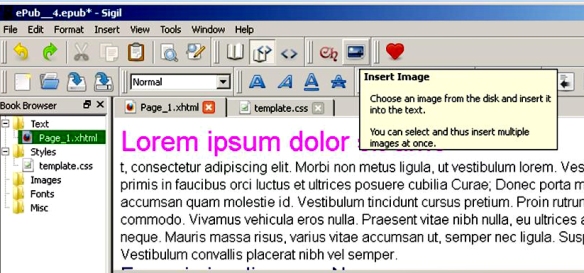
2) Place the Cursor Where You Want To Place the Image and Hit the Insert Image Button. Select the Image To Be Placed.
Here is the image after insertion:
Note that the image is placed inline with its line of text. You can see the XHTML code for this image in the XHTML editing screen. This is all you can do with Adobe InDesign CS5. To apply a float left or right along with text wrap, you need to create and apply a float class to the image as we are about to do.
3) Open Up the ePub’s Style Sheet in Sigil. This style sheet is named template.css. Adobe InDesign created this style sheet. Each CSS style created by InDesign whenever you create a Paragraph or Character Style always has at least the following 11 attributes:
4) Create the FloatLeft Class as Shown Below. This class enables float left and text wrap simultaneously, just like it would on a web page.
5) Apply This Class to the Image. You can see the FloatLeft class applied in the XHTML editing screen. You can see that the image now floats left and also performs text wrap.
Here is the “before” image again so that you can compare the difference:
That’s it!


