If you are self-publishing hardcopy books with color images, you may want to take a long, hard look at converting your book to black-and-white. The printing cost of a black-and-white book is just a fraction of that of a color book, which means you’ll be able to price your B&W book much cheaper and sell a lot more copies.
If you haven’t priced out the difference between color printing and B&W, you’ll be surprised. I’ll give you the numbers from one of my books as an example.
My best-selling book is a 478-page book called Practical and Clear Graduate Statistics in Excel. I originally published the hardcopy version in color using Print-On-Demand from Lightning Source. The printing charge from Lightning Source was $44.02. At a retail price of $79.95 with a 20% wholesale discount (meaning that Amazon would get 20% of the sale price), I earned $19.94 per sale.
Introducing Lightning Source’s Convenient Publisher Compensation Calculator
Lightning Source has a convenient Publisher Compensation calculator on their web site. Below is a screen shot of the LS Publisher Compensation calculators running the numbers above:
Now let’s take a look at the numbers after the same book is converted to B&W. The printing charge from Lightning Source was reduced to $9.90. At a retail price of $39.95 with a 20% wholesale discount, I earned $22.06 per sale. Cutting the retail price in half greatly increases sales and I even earn a few dollars more per sale. Below is a screen shot of the LS Publisher Compensation calculators running the numbers above:
Not every color book will work as a B&W, but many will. Yours might.
Converting a book from color to black-and-white for the most part involves converting all images from color to grayscale. You will also need to create a new cover artwork file because the spine of a B&W POD book is thinner than a color POD book. This requires a whole new cover artwork .pdf file to be created and then uploaded to Lightning Source. Let’s do that first.
First step – Create the New Cover Artwork File
There are two files that must be created when submitted a book to Lightning Source for Print-On-Demand. Both files are .pdf files that must meet rigid, professional-quality printing standards defined by Lightning Source. The first .pdf file contains the book’s contents. The second .pdf file contains the cover artwork.
We have to create a new cover art .pdf when converting from color to B&W because of the thinner spine of the B&W version. B&W POD pages are slightly thinner than the pages in a color POD book. The spine of the B&W version of a book is therefore thinner than the color version. A thinner spine means that a whole new .pdf cover artwork file must be generated.
Introducing Lightning Source’s Convenient Cover Artwork Template Generator
Lightning Source provides a custom cover art template based upon the book’s dimensions, selection of color vs. B&W, binding type, and number of pages. Here are the inputs for Lightning Source’s cover template generator:
The above inputs are for a B&W, 8.5 X 11 inch, perfect bound book, white paper with gloss laminate having 478 pages. I am choosing to have this template emailed to me as a .pdf file that I will open up in Photoshop. Note that the bar code will not include price information. This is nearly always the correct choice if your POD book will be sold in online retail bookstores such as Amazon. I do a lot of experimenting with pricing for all of my hardcopy POD books. That would not be possible at all if the barcodes on my POD books contained fixed prices.
Below is a blank Lightning Source’s .pdf art cover template based on the preceding inputs:
This file then should be opened in Photoshop and the work begins. A specific procedure must be followed when opening Lightning Source’s .pdf template in Photoshop to ensure that bar code will contain only black and white without adding any color. If the bar code contains any color, the cover artwork .pdf file will be rejected by Lightning Source. Opening the .pdf template incorrectly in Photoshop is one major cause of color appearing in the bar code. Here is the correct procedure for opening the .pdf from within Photoshop:
– File / Open / browse and select the blank .pdf template saved on your computer that Lightning Source has emailed to you.
– The “Import PDF” dialogue box will appear. Enter the input choices as follows:
– Crop To: Media Box
– Uncheck: Anti-aliased
– The Width and Height dimensions sent by Lightning Source of the blank template should be correct
– Check: Constrain Proportions
– Resolution: 300 Pixels/inch
– Mode: CMYK Color
– Bit-Depth: 8 bit
After you have correctly opened the template in Photoshop, you can begin creating the front and back covers along with the spine. Red dotted lines in the blank template define the edges of the Safety Region for the covers and spine. No artwork or printing should extend past the Safety Region. The blue dotted lines on the blank template define the edges of the Bleed Region. Background color should extend to the edges of the Bleed Region, but not past it.
The bar code on the back cover can be placed anywhere on the back cover. It does not have to remain in its original position in the blank template
The final cover artwork .pdf that will be submitted to Lightning Source must have the red Safety Region lines and blue Bleed Region lines removed. Everything else in the blank template can remain. When you are ready to save it in Photoshop as the final .pdf, follow this procedure:
– File / Save As
– Name the file: 13-Digit_ISBN_cov.pdf For example: 9781937159139_cov.pdf
– Format: Photoshop PDF
– As a Copy: checked
– Alpha Channels: unchecked
– Layers: Unchecked
– Use Proof Setup: Unchecked
– Embed Color Profile: Unchecked
– Save
– Adobe PDF Preset: [PDF/X-1a:2001]
– Standard: PDF/X-1a:2001
Saving the .pdf at the PDF/X-1a:2001 standard causes all colors to be converted to CMYK and ensures that the resolution is at least 300 ppi, which are two of the main Lightning Source requirements for the uploaded file. Here is what the final cover artwork .pdf in this case looked like:
This cover artwork file is now ready for upload to Lightning Source. It will be a large file because of the 300 ppi resolution throughout. This particular file was 10.9 MB. Let’s move on to creating the black-and-white content file.
Second step – Create the New B&W Content File
The only difference between a color POD book and a Black-and-White POD book is the color of the text and images. The B&W book must have all images in gray scale and all text in black.
Converting all text to black is simply a matter of all selecting all of the text in the entire document (In MS Word click Edit / Select All) and setting the Font Color of the entire selection to black.
Converting all of the images to gray scale will take a bit more work.
How To Convert Color Images To Grayscale
To summarize the process, you’ll need to open each image in Photoshop, set the image’s color mode to grayscale, and ensure that the image is sized properly. After each grayscale image is inserted into the document properly, the document must be saved as a .pdf file that meets the PDF/X-1a:2001 standard, just like the cover. The final step is to run a check called the Preflight check in order to ensure that the entire .pdf file conforms to the same PDF/X-1a:2001 standard that the cover artwork .pdf file conforms must conform to.
The first thing to do is open each image file in Photoshop. The best and safest way to resize and transform an image in Photoshop is to first open it as a “Smart Object.” A Smart Object is a container-like layer that almost anything can be opened up in. No matter what you do to an image opened up as a Smart Object, Photoshop remembers all of the information about the original image and places that information back into the file. To open an image as a Smart Object, click File / Open As Smart Object as shown below:
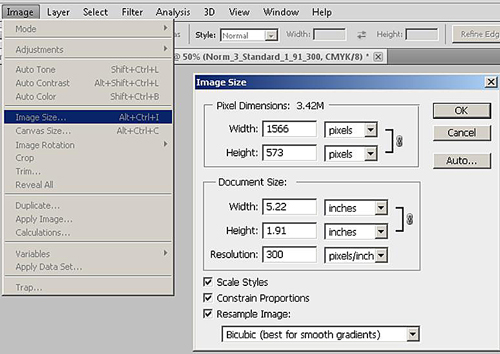
Once the image is opened as a Smart Object in Photoshop, set the image’s size and resolution properly. Click Image / Image Size / and then set the correct setting in the Image Size dialogue box as shown below. The resolution for an image in a POD book should be set to 300 ppi (pixels per inch). Images that consist of line art should be saved at 600 ppi resolution.
The Width and Height dimensions in the Document Size box are the other two measurements to be set. For an 8.5 X 11 inch POD book, I try to make sure that an image’s width never exceeds 5.5 inches and its height does not exceed 8 inches.
The Pixel Dimension setting of width and height would be the dimension to be set if the images were going to be viewed onscreen, such as in an .epub eBook. For an .epub file, I try to ensure that all images are 72 ppi and no more than 500 pixels in width or height. Note that convention is to state the width dimension before the height dimension. Below is the Image Size dialogue box:
After setting the size and resolution of the image correctly, change the color mode to grayscale. Do this by clicking Image / Mode / Grayscale. If the image was not originally in CMYK mode, select CMYK mode first, and then select Grayscale. When you select the color mode (CMYK or Grayscale) you will be asked if you want to rasterize the image. You do want to allow Photoshop to rasterize your image at this point. Below is the menu selection of Grayscale.
Now that your image is properly sized and in grayscale, you can go ahead and swap out the old CMYK color image with the new grayscale version that you just created.
I like to create my content files using MS Word because it is so convenient to make changes. Another big reason that I usually create my content files in Word and not Adobe InDesign is that all of my clients will have MS Word on their computers. I can send my file to them as I am working on it to get their immediate feedback. I couldn’t do that if I did my content files in InDesign because most of my client don’t use InDesign. I don’t dislike InDesign. In fact, it is really a much more capable publishing program than Word. It’s just that my client don’t use it very often.
I am assuming that you have created your content file in MS Word. If you have swapped out all of the color images with grayscale CMYK images, you can now convert the Word document to the final .pdf content file that will be uploaded to Lightning Source.
The best tool to have on your computer for this is Adobe Acrobat. If Adobe Acrobat is loaded on your computer, you will have an Adobe PDF menu item in Word (this is the 2003 version) as shown below.
You’ll need to ensure that the .pdf file will conform to the PDF/X-1a:2001 standard required by Lightning Source. To do this, click MS Word drop-down menu item Adobe PDF / Change Conversion Settings as shown below:
The following Acrobat PDFMaker dialogue box will appear. Set Conversion Settings to PDF/X-1a:2001 and make sure Create Bookmarks and Add Links is unchecked. The PDF/X-1a:2001 setting will, by default, set all colors to CMYK. Leave security defaulted to none. Make sure that the page size is set correctly by clicking Advanced Setting / General / Default Page Size. An 8.5 X 11 inch book should have the width and height settings at 8.5 and 11 inches. All other settings should be defaulted correctly.
After setting the Acrobat PDFMaker dialogue box correctly, convert the Word document to the final .pdf by clicking Adobe PDF / Convert to Adobe PDF. It can take a little while for your computer to complete this process because the final .pdf file can be very large, particularly if there are lots of images. Images at 300 ppi are large files. The content .pdf file of the book shown here, Practical and Clear Graduate Statistics in Excel, was 101 MB.
After this .pdf file is created, it needs to be checked to ensure that it meets the PDF/X-1a:2001 standard required by Lightning Source for POD input files. The test to ensure that the PDF/X-1a:2001 standard is met is called a Preflight check. This is named after the check that pilots perform on the place before take-off.
Open the .pdf file in Adobe Acrobat. I use Acrobat Professional Pro Extended version 9.0. It is expensive software but worth every penny if you do lots of work with .pdf files.
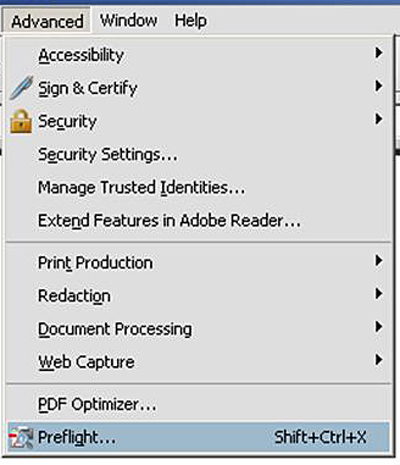
To bring up the Preflight check on the .pdf content file loaded in Adobe Acrobat, click drop-down menu item Advanced / Preflight as shown below:
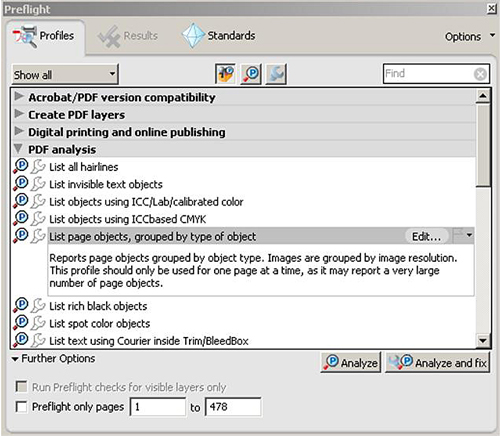
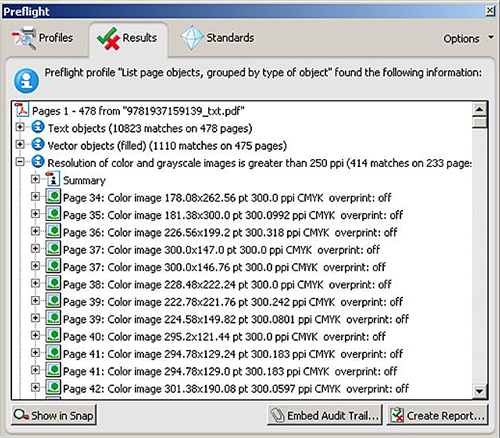
ThePreflight dialogue box will come as shown below. Select PDF Analysis and then select “List page objects, grouped by type of object” as shown below:
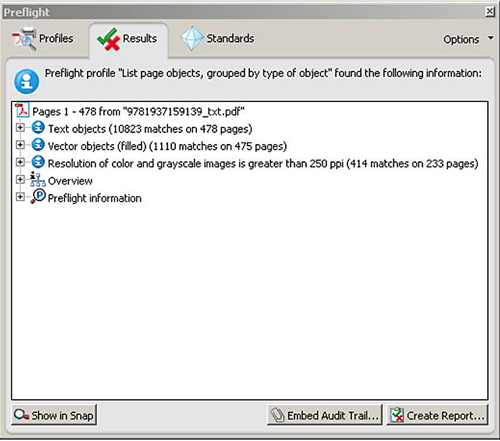
You are most concerned that all images are at least 300 ppi and CMYK.
Below we are expanding the image section of this report to view resolution and color mode of all images.
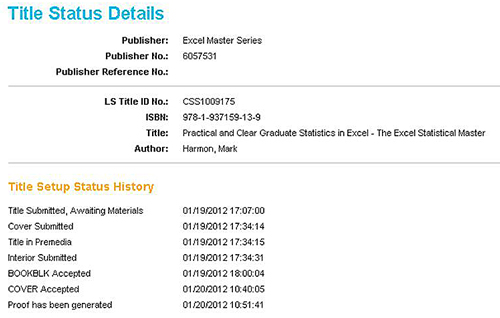
After you have uploaded the cover artwork and content .pdf files to Lightning Source from their web site, you will find out within usually 24 hours whether you have created both files correctly. If both files have been created correctly, you will see the following.
BOOKBLK Accepted (BOOKBLK is the content .pdf file)
COVER Accepted
I have ordered a proof to be made and shipped to me. Below shows that this proof has been generated, but has not yet been shipped to me.
I received the proof of this B&W version of the book and it looked great. Once again, great job by Lightning Source and now I should be able to make a lot more money selling this book in B&W than in color.


