Most comic book and illustrated childrens’ book creators write for a relatively large printed page and not for the hand-held screen. Small details and text that are easily visible on 7×10 or 8.5×11 inch paper can shrink beyond recognition on the 600×1024 px screen of a hand-held Kindle device such as the Fire. Comic book and childrens’ book creators are some of today’s most incredible artists. Many of these talented graphic novel illustrators draw their works on 17 x 11 inch paper. Lots of childrens’ book illustrators actually paint on big canvasses and then take pictures.
Instead of redrawing the entire book for the small screen, there are several great alternatives that make it possible for a Kindle viewer to expand parts of an image such as speech bubbles by just tapping on them.
These techniques utilize Kindle’s new KF8 formatting. They work on all hand-held Kindles and also on Kindle for PC. They are as follows:
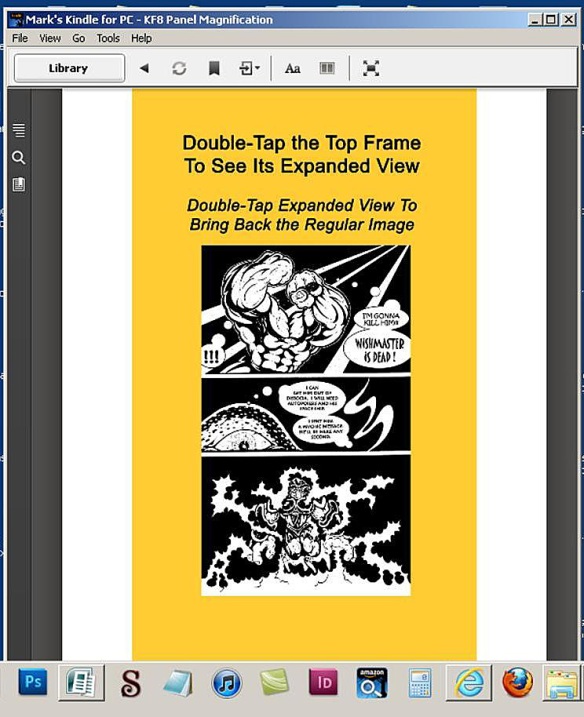
1) Panel magnification – A viewer taps on a single panel of a multi-panel image. That panel expands and the rest of the image is greyed out. This technique is known as panel magnification with a lightbox. My most recent blog article covers in detail how to create the KF8 code for this effect. Here is a link to that article:
http://blog.epubandebookhelp.com/2012/05/16/kf8-panel-magnification/
Here is how KF8 panel magnification with a lightbox looks in action:
To expand the top frame, click on it and here is the result:
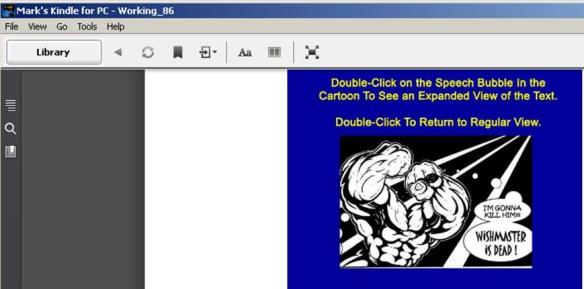
2) Covering a speech bubble with a larger, filled frame containing expanded text – The speech bubble is still there, but is no longer visible because larger text inside a filled border is been placed on top of it. The viewer simply taps on the speech bubble to activate the visibility of thelarger text, which was invisible until then. This blog article will show how to write the KF8 code to create this effect, which is shown as follows:
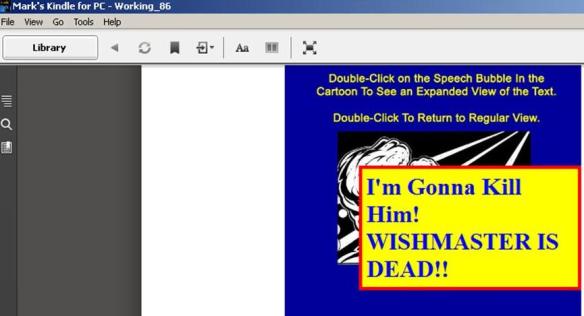
Just tap on the speech bubble and the following text surrounded by a filled border appears on top of the speech bubble and covers it up completely:
3) Swapping text with different text – This effect enables a viewer to tap on a screen and swap one set of text with a new set of text that can have totally different formatting and screen position. This KF8 effect makes the initial text invisible and makes the new text visible. This blog article will also show how to write the KF8 code to achieve this effect, which is shown below:
A quick tap on “This is the original text” produces the following result:
This blog article will show in detail how to write the code for KF8 effects numbers 2 and 3 above.
General Explanation of Replacing Speech Bubbles or Text With Larger Text
1) A Tap Target is created. The Tap Target is a region on the viewing screen that the viewer taps (in hand-held Kindles) or clicks (in Kindle for PC) to activate the text swap. The Tap Target is a <div> container that either provides the location of the speech bubble within the image or actually contains the initial text that will be swapped out.
2) A Parent Container is created. The Parent Container is also a <div> container that holds the text that will cover up the contents of the Tap Target, whether that is a speech bubble or just regular text. The Parent Container is configured to be invisible because its CSS attribute “display” is set to “none.” The KF8 effect makes the Parent Container and its contents visible. This effect either covers up what was under the Tap Target (in the case of a speech bubble) or replaces the contents of the Tap Target <div> container (in the case of a text swap).
3) Next we use KindleGen to convert the .epub file to .mobi. KindleGen has to be used to create any .mobi file that employs KF8 formatting. KindleGen can be downloaded from Amazon and currently runs only from the command prompt on your computer.
4) Finally we are ready to view the .mobi file in a real Kindle e-reader. The Kindle Previewer isn’t capable of performing KF8 effects such as panel magnification or text swapping. You’ll need to load the .mobi file on an actual Kindle e-reader such as Kindle for PC or the Kindle Fire to view the KF8 effects in action. A regular ol’ Kindle will work just fine as well.
To load the .mobi file on your Kindle For PC, just paste the .mobi file into your My Kindle Content directory, which will be located in your My Documents directory. The My Kindle Contents directory is created when Kindle for PC is installed on your PC. When you open up Kindle For PC, you’ll see the new .mobi file sitting on the bookshelf.
To load the .mobi file into a Kindle hand-held device such as a Fire, connect the device to your computer with a USB cable. The Kindle will appear as another directory in your computer. Paste the new .mobi file into the Books directory of this Kindle device. When you go back into your Kindle, you’ll find the new .mobi file sitting on the bookshelf of the Docs directory, not the Books directory.
5) Once the viewer has opened up the .mobi file in their Kindle, the viewer can click (in Kindle for PC) or tap (in a hand-held Kindle) on the Tap Target to activate the swap. The KF8 coding that will be shown here controls that swap. The contents of the Parent Container are made visible and brought to the top. The contents of the Parent Container either cover up what is under the Tap Target (in the case of a speech bubble) or replace what was in the Tap Target (in the case of swapping text).
******************************************************************
Before I present the HTML and CSS for this effect, let me provide some tips to make it easy to edit an .epub file. Keep in mind that you do all of the editing to an .epub file. The very last step is to convert the .epub file to a .mobi file and then load it into the Kindle e-reader. You never do any editing directly to a .mobi file.
I usually start building my .epub files from scratch by opening up a brand-new blank .epub file in the free epub editor Sigil. First I create and name all of the blank HTML and CSS pages that I’ll be pasting content into.
In this case, it only necessary to create a single, blank HTML page in the Text directory and name it SwapText.xhtml and a single, blank CSS page named SwapText.css in the Styles directory. The Text and Styles directories are default directories that appear in a new, blank epub file created in Sigil.
Following that, while you still have Sigil open, insert the 600×1024 image shown below into the default Images directory of the brand-new .epub file. This image should be named TextSwap.jpg.
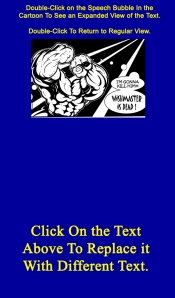
TextSwap.jpg – Drawn By Fantastic Comic Book Artist Kris Aquino in His Comic Book Series “Dimensions” That I’m Preparing For Upload To Amazon Kindle At The Time Of This Writing
I then add some basic meta data such as author name and book title to the file while it is still open in Sigil. I now save the file and close Sigil. Sigil will save the file as an .epub file. The filename that you save this .epub file will not be the ebook’s name when you see it on the book shelf of your Kindle e-reader. The ebook’s name as it will appear when on the book shelf is set as a meta tag in the .epub’s content.opf file. You can directly edit the content.opf file as explained later or simply use Sigil’s Meta Tools to set this title along with the author’s name.
You’ll want to do all of your editing to this .epub file using a free text-editing program such as Notepad++, or something similar which has numbered lines and search/replace functions. If you have a Mac, you’ll want to use a free program called TextWrangler instead of Notepad++. Don’t use Windows Notepad as it doesn’t have the numbered-lines feature. Some of the files you’ll be editing here will looks like a dog’s breakfast if you open them up in Windows Notepad.
I recommend using Notepad++ and not Sigil to edit the HTML, especially in this case. I noticed that Sigil would do funny things to the JSON object (discussed below) that I had to undo every time I opened the .epub file up in Sigil. This didn’t happen with Notepad++.
I can now work the epub’s component files directly by changing the .epub extension to .zip and then opening this .zip file with WinZip. Once you have unzipped the .zip file, use the free text editor Notepad++ to edit all of the component files inside the .zip file from here on out.
Now we’re ready to edit.
With that, let’s get right into it. I’ve placed both effects on the same page of the .epub/.mobi file so that all of the HTML and all of the CSS for both effects will be seen on a single .xhtml page and a single .css page. Initially I will present all of that HTML and all of that CSS for both effects.
I will then separate the effects and show how the HTML and CSS interact to create each of the two effects individually.
I will also show what lines of code have to be added to the .epub’s content.opf file to enable KF8 effects on your Kindle devices.
First, let’s start with the combined HTML for both effects. Here it is:
<?xml version=”1.0″ encoding=”utf-8″ standalone=”no”?><!DOCTYPE html PUBLIC “-//W3C//DTD XHTML 1.1//EN” “http://www.w3.org/TR/xhtml11/DTD/xhtml11.dtd”>
<html xmlns=”http://www.w3.org/1999/xhtml”>
<head>
<title></title>
<link href=”../Styles/SwapText.css” rel=”stylesheet” type=”text/css” />
</head>
<body>
<!—Configuring overall screen and image size for both KF8 effects –>
<!– Defines page size (600 X 1024) and contains everything –>
<div class=”fillScreen”>
<!– Defines image size (600 X 1024) and positioning – absolute –>
<div><img alt=””
class=”image” src=”../Images/Text_Swap.jpg” />
</div>
<!—Effect A – Replacing a Speech Bubble In An Image With Larger Text –>
<!– Creates the Tap Target –>
<div id=”tapTarget_A”>
<!—The JSON object that controls panel magnification –>
<a class=”app-amzn-magnify”
data-app-amzn-magnify=
‘{“targetId”:”parentContainerPosition_A“, “ordinal”:1}’>
</a>
</div>
<!– Here is bordered container with new text –>
<div id=”parentContainerPosition_A”
class=”parentContainerBorder_A“>
<p class=”finalTextFormatting_A”>
I’m Gonna Kill Him! WISHMASTER IS DEAD!!
</p>
</div>
<!—Effect B – Replacing Text With Different Text –>
<!—The original text to be replaced is contained within the Tap Target –>
<!– Creates the Tap Target –>
<div class=”tapTarget_B”>
<!—The JSON object that controls panel magnification –>
<a class=”app-amzn-magnify”
data-app-amzn-magnify=
‘{“targetId”:”parentContainerPosition_B“,
“ordinal”:2}’>
<p class=”tapTargetFormatting_B”>
This is the original text
</p>
</a>
</div>
<!—The Parent Container contains the replacement text –>
<div id=”parentContainerPosition_B” class=”targetMagnifier_B”>
<p class=”finalTextFormatting_B”>
And here is the replacement text
</p>
</div>
</div>
</body>
</html>
Now here is the combined CSS for both effects:
/* This first section of the stylesheet is called a CSS Reset. */
/* A CSS Reset removes inconsistent formatting that browsers often apply */
html{color:#000;background:#FFF;}body,div,dl,dt,dd,ul,ol,li,h1,h2,h3,h4,h5,h6,pre,code,form,fieldset,legend,input,textarea,p,blockquote,th,td{margin:0;padding:0;}table{border-collapse:collapse;border-spacing:0;}fieldset,img{border:0;}address,caption,cite,code,dfn,em,strong,th,var{font-style:normal;font-weight:normal;}li{list-style:none;}caption,th{text-align:left;}h1,h2,h3,h4,h5,h6{font-size:100%;font-weight:normal;}q:before,q:after{content:”;}abbr,acronym{border:0;font-variant:normal;}sup{vertical-align:text-top;}sub{vertical-align:text-bottom;}input,textarea,select{font-family:inherit;font-size:inherit;font-weight:inherit;}input,textarea,select{*font-size:100%;}legend{color:#000;}
/* This section configures the whole screen and the image that will be used for both effects. */
div.fillScreen {
height: 1024px;
width: 600px;
position: relative;
}
div.fillScreen div {
position: absolute;
}
div.fillScreen a {
display: block;
width : 100%;
height: 100%;
}
.image {
position: absolute;
height: 1024px;
width: 600px;
}
/* Effect A – This section replaces a speech bubble with text that is surrounded by a border and solid background */
#tapTarget_A {
top: 21%;
left: 60%;
height: 20%;
width: 25%;
}
#parentContainerPosition_A {
top: 20%;
left: 25%;
width: 70%;
}
div.parentContainerBorder_A {
position: absolute;
display: none;
font-size: 150%;
font-weight: bold;
padding: 10px;
border: 7px solid red;
background-color: yellow;
}
p.finalTextFormatting_A {
text-align: left;
color: blue;
font-family: “Times”;
}
/* Effect B – This section swaps text with different text that is formatted differently. */
.tapTarget_B {
position: absolute;
top: 65%;
left: 15%;
}
p.tapTargetFormatting_B {
text-align: left;
font-family: “Times”;
}
p {
margin: 0%;
padding: 0%;
color: white;
font-size: 2em;
}
#parentContainerPosition_B {
top: 60%;
left: 15%;
width: 85%;
}
div.targetMagnifier_B {
position: absolute;
display: none;
font-size: 125%;
}
p.finalTextFormatting_B {
text-align: left;
color: yellow;
font-weight: bold;
font-family: “Arial”;
}
**************************************************************
And that’s it for the CSS.
Before I go through each section of HTML and show how it interacts with the CSS to produce the text swap effect. we’ll add the following lines of code to the content.opf file. This code must be added to the content.opf file to enable KF8 functionality in Kindle devices.
Once again, to edit the content.opf file, change the .epub extension to .zip and open the file in WinZip. Open up the individual files inside the zipped file using Notepad++ and then do your editing. When you finish editing, change the .zip extension back to .epub.
Below are the lines that should be added to the meta data section of the .epub’s content.opf file in order to enable KF8 effects:
<meta name=”fixed-layout” content=”true”/>
<meta name=”orientation-lock” content=”none”/>
<meta name=”RegionMagnification” content=”true”/>
<meta name=”original-resolution” content=”600×1024″/>
<meta name=”zero-gutter” content=”true”/>
<meta name=”zero-margin” content=”true”/>
Here is what each of the above lines added to the content.opf file do:
<meta name=”fixed-layout” content=”true”/>
The above tag that tells the Kindle e-reader to use fixed-layout properties.
<meta name=”orientation-lock” content=”none”/>
This tag can be set to the following choices: portrait-only/landscape-only/none. You might pick portrait-only, for example if you wanted your file viewable only as portrait in smaller devices such handhelds. That is not the case here. If you are viewing this file on a Kindle Fire, it will be viewable in both portrait (if you’re holding the Kindle Fire upright) or in landscape (if you’re holding the Kindle Fire sideways).
<meta name=”RegionMagnification” content=”true”/>
The above line enables panel magnification in KF8.
<meta name=”original-resolution” content=”600×1024″/>
This identifies the original display size that the content was designed for. This content was originally designed to function in a Kindle Fire, which has a screen size of 600×1024 px.
<meta name=”zero-gutter” content=”true”/>
<meta name=”zero-margin” content=”true”/>
These allow the whole screen to be filled out.
Amazon also states that one of the following book-types should be added to the meta-data section of the content.opf file:
<meta name=”book-type” content=”children”/>
<meta name=”book-type” content=”comic”/>
This is an optional entry. You should leave it out. Text swapping will function perfectly without it. Including a book-type value will disable some of the live-text functions in a fixed-layout KF8 ebook, such as bookmarks, highlights and annotations, full search, and dictionary. Background image pinch-and-zoom using double-tap won’t work if the “comic” book-type is selected.
I don’t know of any reason to include a book-type value in the meta-data section of the content.opf file. Amazon’s documentation doesn’t currently list any reason either.
Here is one more useful tip regarding the content.opf file: When you create a new .epub, one of the first things you should do is to update the title in the meta-data section of the content.opf file. The Kindle reader will show the title of a .mobi file that listed in the content.opf file, the name of the .mobi file that you have saved it as. If you forget to update the title in the content.opf file when you create a new file (especially if you created the new .epub by copying and existing .epub file), you might open up your Kindle device and find that two .mobi files sitting on the bookshelf have the same name.
And finally, here is how the HTML interacts with the CSS to create the text swap effects shown above.
*****************************************************************
<!—Effect A – Swapping a Speech Bubble In An Image With Larger Text –>
<!– Creates the Tap Target –>
<div id=”tapTarget_A”>
#tapTarget_A {
top: 21%;
left: 60%;
height: 20%;
width: 25%;
}
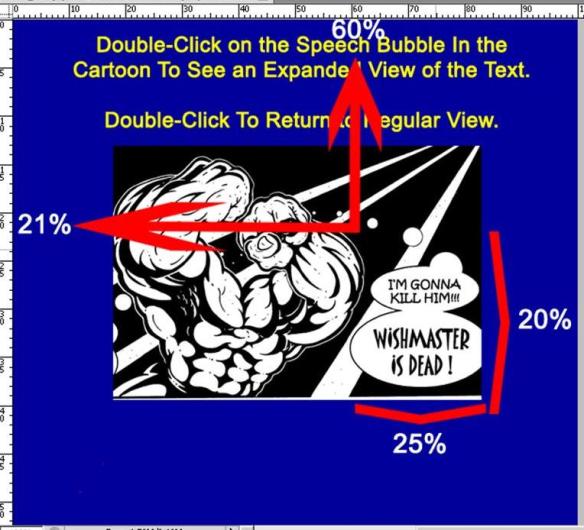
This CSS code indicates that the Tap Target starts on the screen with its upper left corner 21% of the screen’s height down from the top and 60% of the screen’s width from the left. The height of the rectangular Tap Target takes up 20% of the screen’s height. The Tap Target’s width takes up 25% of the screen’s width.
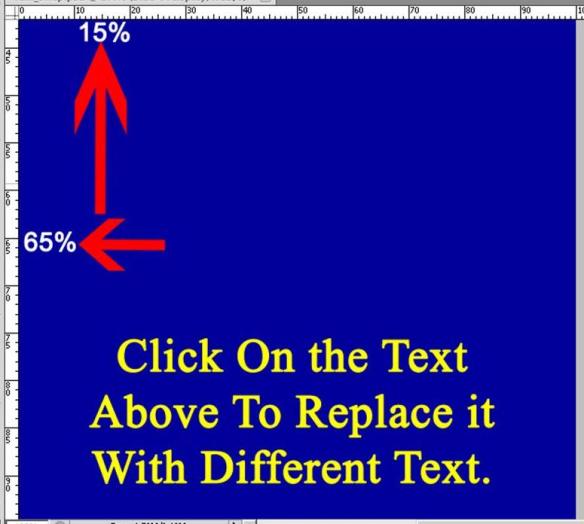
These dimensions can be determined by dropping the image into Photoshop and viewing the measurement ruler that will appear on the image’s edges.
When the image is opened up in Photoshop, enable the Rulers (View / Rulers) and set the Ruler to show increments of height and width as percents of the image’s height and width (Edit / Preferences / Units & Rulers / Rulers : Percent).
A screen shot of this Photoshop work is shown below. It doesn’t matter how large or small you’ve sized the image before opening it in Photoshop. The height and width will always measure 100%. You simply have to figure out where you want your Tap Target to be in the image and where the image’s edges line up on the percent rulers. Do it as follows:
*****************************************************************
Below we create the JSON object that controls the text/speech bubble swap
<!—The JSON object that controls the text/speech bubble swap –>
<a class=”app-amzon-magnify” data-app-amzn-magnify=
‘{“targetId”:”parentContainerPosition_A“, “ordinal”:1}’>
</a>
</div>
Inside this div container is a JSON object, shown once again below:
<a class=”app-amzon-magnify”
data-app-amzn-magnify= ‘{“targetId”:” parentContainerPosition_A “,
“ordinal”:1}’>
</a>
A JSON (JavaScript Object Notation) object is a convention used to transfer collections of name/value pairs. This JSON element app-amzn-magnify is specific to Amazon products and is not listed anywhere else in CSS. It controls the text swapping process.
Here is what each part of the JSON element does:
<a class=”app-amzon-magnify” This anchor contains the JSON element which controls the text swapping process)
“targetId”:” parentContainerPosition_A ” This identifies the region that will be expanded. This must match the id of the parent container for the replacement text, window, and the larger image. This parent container label appears in the next line of HTML code after the JSON object as follows:
<div id=”parentContainerPosition_A” class=”parentContainerBorder_A”>
“ordinal”:1 The ordinal states the order that the JSON object will appear on the page. There is only one JSON object on this page so the ordinal = 1. The next KF8 effect on this page will have the ordinal set to 2.
“SourceId” This is a tag that is listed in Amazon’s Kindle Publishing Manual but is not needed for this effect.
The CSS id #parentContainerPosition_A also provides the location of the replacement text that will cover the speech bubble. The upper-left corner of this text will start 20% down from the top, 25% from the left of the screen, and extend 70% of the width of the screen.
#parentContainerPosition_A {
top: 20%;
left: 25%;
width: 70%;
}
The speech bubble is completed covered because the text is enclosed within a large border that contains a solid background. The border’s size is larger than the speech bubble and therefore completely covers up the speech bubble. The div class parentContainerBorder_A configures the border and background.
Everything within this <div> container is invisible because the div’s CSS display attribute is set to “none.” Everything within this <div> container will be invisible until the KF8 effect is activated by a click or tap on the Tap Target. The KF8 effect sets the contents of this <div> container to be visible and on the top layer.
div.parentContainerBorder_A {
position: absolute;
display: none;
font-size: 150%;
font-weight: bold;
padding: 10px;
border: 7px solid red;
background-color: yellow;
}
***********************************************************************
This HTML creates the Parent Container, which contains the replacement text, the text’s formatting, the border, and the solid background. All of these will cover up the speech bubble when they are set to be visible and on the top layer.
<!– Here is bordered container with new text –>
<div id=”parentContainerPosition_A”
class=”parentContainerBorder_A“>
<p>
I’m Gonna Kill Him! WISHMASTER IS DEAD!!
</p>
</div>
The CSS id #parentContainerPosition_A provides the location of the replacement text that will cover the speech bubble. The upper-left corner of this text will start 20% down from the top, 25% from the left of the screen, and extend 70% of the width of the screen.
#parentContainerPosition_A {
top: 20%;
left: 25%;
width: 70%;
}
The speech bubble is completely covered because the text is enclosed within a border that has a solid background. The div class parentContainerBorder_A configures this border and background. Its CSS display attribute is set to “none” so that anything in this <div> container will not be visible until the KF8 effect is activated.
div.parentContainerBorder_A {
position: absolute;
display: none;
font-size: 150%;
font-weight: bold;
padding: 10px;
border: 7px solid red;
background-color: yellow;
}
The replacement text formatted by the following CSS:
p.finalTextFormatting_A {
text-align: left;
color: blue;
font-family: “Times”;
}
The above style is the inner-most CSS style and will therefore over-ride all other CSS parent styles that are applied to it.
***********************************************************************
<!—Effect B – Replacing Text With Other Text That Can Be Formatted and Positioned Differently –>
<!– Here is original text to be replaced –>
<!– Creates the Tap Target –>
<div class=”tapTarget_B”>
The location of the Tap Target is configured by the following CSS:
.tapTarget_B {
position: absolute;
top: 65%;
left: 15%;
}
This states that the Tap Target has its upper left corner 65% down the screen from the top and 15% of the screen from the left.
<!—The JSON object that controls panel magnification –>
<a class=”app-amzn-magnify” data-app-amzn-magnify=
‘{“targetId”:”parentContainerPosition_B“, “ordinal”:2}’>
<p>
This is the original text
</p>
</a>
</div>
This initial text to be replaced is within the above <div> container. This text is formatted by the following two CSS classes:
p.tapTargetFormatting_B {
text-align: left;
font-family: “Times”;
}
p {
margin: 0%;
padding: 0%;
color: white;
font-size: 2em;
}
<!– Here is the Parent Container with the replacement text that has new formatting and positioning –>
<div id=”parentContainerPosition_B” class=”targetMagnifier_B”>
<p>
And here is the replacement text
</p>
</div>
This Parent Container is positioned by the following CSS class:
#parentContainerPosition_B {
top: 60%;
left: 15%;
width: 85%;
}
Note that the Parent Container is positioned 5 % above the Tap Target, whose position is shown once again in Photoshop below:
The magnification factor within the Parent Container and also the initial attribute of invisibility is set by the following CSS class:
div.targetMagnifier_B {
position: absolute;
display: none;
font-size: 125%;
}
The general formatting of any text tagged as a paragraph on this page is set by the following CSS class:
p {
margin: 0%;
padding: 0%;
color: white;
font-size: 2em;
}
And finally, the formatting of text inside any paragraph within this Parent Container is set by the following CSS class:
p.finalTextFormatting_B {
text-align: left;
color: yellow;
font-weight: bold;
font-family: “Arial”;
}
So, that’s how to create text swapping with KF8. It is a much quicker process than KF8 panel magnification, which requires lining up panel exactly with CSS. This technique of text swapping will work on all hand-held Kindle devices and also on Kindle for PC.
If you are interested in adding any of the above KF8 techniques to your comic book or children’s book, feel free to contact me at:

